Monday, April 28, 2008

Chapter 9 - Main gear

I have begun installation of the main gear attach tabs. Actually this is my second go. The first time around I had the first of the BID and UNI layups inplace. Unfortunatly I got distracted and the gear bow fell off the workbench and the plywood tabs all broke off. Lesson learned, this time around I secured the bow with a wire...

Here is the main gear strut leveled on the ply wood tabs.


And here is a closeup of the plywood tabs. Note the bondo holding the strut in place. Not visible are shims between the strut and the steel tubes.


Another view of the temporary plywood tabs just prior to removal of the steel tubes.


Here the strut is staged for the first of the UNI and BID layups. Note the wire to hold the strut down and the duct tape to prevent the temporary plywood tabs from bonding to the glass.


The first layers of glass tabs after initial trimming.

Saturday, April 19, 2008

Chapter 9 - Landing brake - Part 3

Over the last week I have been making some slow progress on the landing brake. I have quite a bit of work left on this brake, from faring to the control hardware ( I am seriously considering an electric actuator over the lever, cables, springs etc..). What follows are some photos of the process since my last landing break post....

Here are three plies BID layed up over the foam core of the landing brake. Note the duct tape to prevent the landing brake plies from bonding to the fuse.


Here is the brake after the outside skin has cured. You can see the foam core, aluminum piano hinge and plywood reinforcement (later to cause some difficulty).


Here is the brake following lay up and cure of the inside 3 plied of BID. The piano hinge is bolted to the fuse through three holes drilled and tapped into the aluminum blocks installed previously.


The landing brake in the open position.


Here is a close up shot of the hinge. I had to remove a portion of the plywood block because it was interfering with the center bolt and would not allow the brake to fully close. I will lay up 3 to 6 plys BID in place of the plywood block in that area. I have AN screws that will be placed in the remaining 4 holes, but I will need washers for those.

Friday, April 11, 2008

Chapter 9 - Main wheels

Not much to say here, but WHEELS!

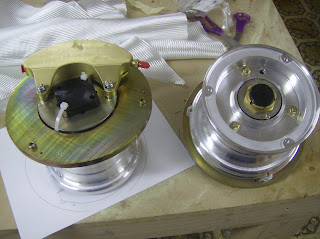
Pictured below are a pair of Matco W51LT wheels.
I went through some different options in my head for the wheels and finally decided to go with th matcos. They provide sufficient braking power and are available at the right price. These were purchaed as a kit from Wicks and include wheel, break bearings, axles axle nut etc...

Sunday, April 6, 2008

Chapter 9 - Landing brake - Part 2

I did more work on the landing brake today. Here I have 5 min. epoxied the 3 LB22 aluminum blocks to the "front" of LB23 (1/4" spruce plywood). These aluminum blocks will later be drilled out and tapped to receive bolts to attach to the piano hinge for the landing brake.


Test fitting LB 23 with aluminum blocks attached with epoxy. This piece is later micro'd in place.


Landing brake recess ready for glassing


Landign brake resess after glassing.


Saturday, April 5, 2008

Chapter 8/9 - Seat belts, main gear, and landing brake.

Ok, I have quite a bit going on at once now. The seat belts arrived from ACS. Pictured is the front belts test fitted.


Here is the step that I fabricated. After all the cutting drilling bending hammering etc. I should have just bought one premade from the cozy girrrl. I probably would not have saved any money and I would have save quite a bit of time. Lessons learned. I still need to do some additional bending and counter sink the two inner holes.


The main landing gear her is pictured after I laid up the first 4 torsional plies of UNI. I have since finnished all 8 and I am working on the break line conduit. More on that later.


The final two pictures show the first couple of steps involved in fabricating and installing the landing break.


The use of my brothers Fein tool made removal of the fiberglass skin here a painless process. Now I have a little bit of foam shaping to do. More blue dust to come!!