Monday, November 26, 2007

Landing gear brackets - Part 2

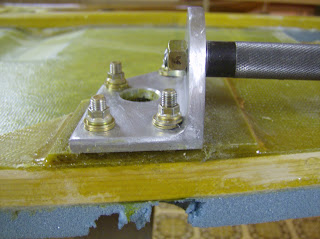
Today I picked up a Dremmel type tool. It came with 100 different grinders, sanders etc. The thing I don't like about these is that they offer 5 dozen not quite right ways of doing things. Still I managed to nibble away just the right amount of aluminum to allow the washers to sit flat. All in all I think it turned out alright.

Also I have been getting quite a few tips online on the landing gear attach area. Its time to sit down and scan the newsletters more closely to make sure there isn't anything else I might have missed.


Sunday, November 25, 2007

Landing gear brackets


Today I floxed the landing gear extrusions to the 15 ply pads on the fuselage sides.

After letting the flox set for a few hours I drilled out the 1/4" holes through the sides for the attachment bolts.

Unfortunately two of the 1/4" holes I drilled through the forward extrusion were two close to the perpendicular side of the extrusion. This left too little clearance for the washers as you can see in the following photo.


One solution I tried was to grind off a portion of each washer. Perhaps there is a better solution. Any suggestions are welcome.


Thursday, November 15, 2007

Chapter 6 - Fuselage assembly - Part 1

Well I haven't quite finnished chapter 5, but I need some additional materials to complete that chapter (fiberglass, aluminum, some steel parts etc.).

Despite that, I decided I could test fit the bulkheads to the sides to ensure everything will fit. Most everything looks real good but I will need to do some trimming at the fire wall to ensure everything is straight and will fit the main spar cutout. Still, I don't anticipate any problems finishing this chapter or the next.

Note: Yes, I know the instrument panel is installed backwards. Not to worry though, none of the bulkheads are permanently attached.


Saturday, November 10, 2007

Chapter 5 - Fuselage sides - Part 2

Last weekend my brother again headed down from Seattle and gave me a hand glassing up the two sides. Each side took a few hours each to prepare and glass up. For the most part everything went togather as planned. However somehow a couple of foam peices shifted while the micro was setting up and I had to cut and reglue that bond.

Also I used my brothers Fein tool to trim the glass on one side after it set up. I really like the tool and have found it quite useful. Unfortunately the vibrating motion of the blade pulled the cured glass away from the foam in a couple of places. I was able to get some pure epoxy into those places and after applying some weight the foam and glass were well bonded back to gather.