Tuesday, May 26, 2009

Chapter 17/Section IIL - Pitch trim and Throttle Quadrant

While awaiting the arrival of the canopy I sort of got sidetracked and began to work on more of the left front console. What follows included the completion of the pitch trim handle installation as well as the installation of the throttle quadrant. 

For a year or so now I have (when bored) thumbed through my Wicks and ACS catalogs and I always really liked the looks of the RV throttle quadrants. Unfortunately there is not a reversing option available. Reversing is of course necessary because the engine is in the rear. After some thought I realized it should be a simple matter to replace the aluminium bars with some extra long ones, thus providing the reversing function. I painted them black, however I may have them anodized to match the rest of the unit in the future.

I really don't know if selection of this quadrant was a good idea, it was sort of expensive, it took quite a bit of time to get it to fit right and installation at this time is not necessary, however I like the results. The quadrant provides a throttle and mixture controls. Carb heat (if necessary) will be controlled via a push pull knob mounted on the panel near the quadrant. In order to use this set up I will make the entire left console removable so access to trim and throttle cables will be accessible.

Here is the pitch trim handle installed.


Here is the throttle quadrant install on the left front console. Pictured are the extra long control bars to allow for reversing the action of the engine controls. Also an aluminium bracket that will eventually be bolted to EZ point fasteners.


Here is the console and throttle quadrant test fitted into the cockpit. Also visible is the friction lock and the friction lock cover. I will either bond the cover or screw it to the console.


Saturday, May 23, 2009

Chapter 18 - Canopy - Part 1

Yesterday the canopy was delivered to the general store down the street. Shipping is a little cheaper sometimes for larger shipments if a comercial address can be supplied. The nice fellow who ows the general store agreed to recieve the canopy and as it happens I was driving by 5 minutes after it arrived and saw the large box sitting outside. I staped in on my roof rack and brought it home to the workshop.

After unpacking the canopy I was a little suprised to find that it was already roughly trimmed. The plans (written decades ago) indicate that the canopy should be trimmed from a rectangular base leaving about a 1/4" flange around. My canopy is just trimmed strait on the bottom and aft end.

After pondering this fact for a little bit I determinded it is trivial and actually has saved me some work. I did notice thought that the aft end of the canopy did need to be trimed to the proper length.

Here is the canopy as delivered.


Pitcured here you can see how I masked and marked the aft end of the canopy for trimming. I used a cutoff wheel in my dremel tool. That worked very good and only required a little sanding to finnish.


Here is the canopy after finishing

Sunday, May 17, 2009

Chapter 19 - Pitch trim.

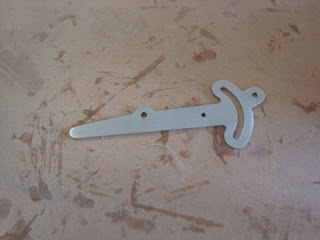
I am still awaiting canopy and other materials so, after looking through the plans for more misc. things to complete, I decided to fabricate the happy pitch trim handle yesterday.

I like the look of the aluminium and because the top portion (left in photo) of the part will be visible, I decided to clear coat the part instead of treating it with alumiprep and alodine.


Friday, May 15, 2009

Capter 24 - Covers Consoles and Fairings - Part 1

Time for a diversion....

I was just gearing up to shape the nose when it was suggested to me that I shape the canopy, canard cover and nose all at the same time. This sounded like a good idea and after looking at photos of the advisers aircraft I have decided to go ahead and order a canopy from Todd's Canopies.

In the meantime, while I wait for the canopy to arrive I decided to work a little on the pilots left side console.

Here is the two peices of .35" divinicell foam covered with 1 ply bid...


And here are the they are after trimming and assembled with a flox radius and 2" bid tape...


And finally 2 ply's bid fiberglass over the outside...


This was trimmed and here is the panel test fit into the cockpit. I will do no further work on this untill I have the throttle quadrant and eleveator trim mechinisms installed.