Sunday, December 30, 2007

Chapter 6 - Fuselage bottom - Part 2

After finally just resigning to the fact that this next step was going to make a big mess, I got to work and finished contouring the fuselage bottom. It did indeed throw blue bits everywhere
(not unlike a Unicef advertisement http://www.youtube.com/watch?v=7MAYrF1PDks)

I made a small mistake at the back seat area. I started to contour all the way to where the triangular longeron is to be bonded. I then realized this area should be left alone because the rear consoles would be located in that area. The damage was minimal and I should be able to fill it in after the consoles are installed. Measure twice, cut once!!!!


I used an angle grinder with a heavy duty sanding disk for the majority of the work. This worked quite well. It cut through the foam like butter. It also made good work of my left index finger taking the skin off the the knuckle nearly down to the bone. I used a pair of work gloves my father sent me for X-mas after that little incident, thanks Dad. I also picked up a first aid kit when I was at the hardware store. I found that I only had a couple of little Sponge Bob bandages in the house.

After contouring the bottom I place it upside down on the fuselage as instructed in the plans.

I used 2 8' 1x4 peices of lumber cut to 7' with the 1' scraps used as shims to jig the bottom to the fuselage curve. The lumber was then bonded to the foam with small dabs of bondo to ensure the peice holds its curve for glassing.


Wednesday, December 26, 2007

Chapter 6 - Fuselage bottom - Part 1

I have started to contour the fuselage bottom, however my workshop is getting far to cluttered. I will need to stop for a little bit and regroup, clean and make sure my shop is ready for this step as it will generate a good deal of foam bits everywhere.

This is by far the worst shape my shop has been in since I was well into my Kayak project and I do not feel comfortable working on an aircraft project with this much clutter. Compare these photos to the first few when I started.


Tuesday, December 18, 2007

Chapter 6 - Fuselage assembly - Part 2


I have finaly finished assembing the fueslage sides and the bulkheads. I did not take many photos as they pretty much look the same as the last chapter 6 photos posted.


If I were to do this again I would have built a smaller shorter level work stand for the fuselage. Six hours of standing on my workbench and hunching over to tape all of the bulkhead joints was not my idea of fun. It was long, but not EZ if you get my drift.


Anyhow its done, now onto the fuse bottom. Any words of wisdom before I start to cut foam for the bottom are welcome.

Airspeed indicator

It's probably a little to early to be thinking, let alone purchasing, insturments, but when a good deal comes along, one should take it. I picked this up on ebay a couple of weeks ago. The seller said it came out of his Long-EZ due to an upgrade. I am considering a Dynon EFIS, but a couple of pitot static backup gauges if there are room probably would not be bad. Anyhow I picked it up for under $60. The same item sells for over $400 from Aircraft spruce.

I performed a crude test with a tube out side the car window and it seems to be working fine.


Landing gear brackets - Part 3

I have finally finished the landing gear bracket installation. Below you can see picture of the proccess I used to install the 15 ply reinforcements and the landing gear brackets. The plans call for 15 ply bid fiberglass to be layed up directly to the bracket install locations. I used a tip provided by a Canard Zone contributer to first lay up the 15 plys and then cut them to shape and flox them in place. This made for a neat clean layup of the reenforcement areas.

Monday, November 26, 2007

Landing gear brackets - Part 2

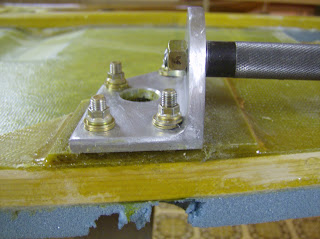
Today I picked up a Dremmel type tool. It came with 100 different grinders, sanders etc. The thing I don't like about these is that they offer 5 dozen not quite right ways of doing things. Still I managed to nibble away just the right amount of aluminum to allow the washers to sit flat. All in all I think it turned out alright.

Also I have been getting quite a few tips online on the landing gear attach area. Its time to sit down and scan the newsletters more closely to make sure there isn't anything else I might have missed.


Sunday, November 25, 2007

Landing gear brackets


Today I floxed the landing gear extrusions to the 15 ply pads on the fuselage sides.

After letting the flox set for a few hours I drilled out the 1/4" holes through the sides for the attachment bolts.

Unfortunately two of the 1/4" holes I drilled through the forward extrusion were two close to the perpendicular side of the extrusion. This left too little clearance for the washers as you can see in the following photo.


One solution I tried was to grind off a portion of each washer. Perhaps there is a better solution. Any suggestions are welcome.


Thursday, November 15, 2007

Chapter 6 - Fuselage assembly - Part 1

Well I haven't quite finnished chapter 5, but I need some additional materials to complete that chapter (fiberglass, aluminum, some steel parts etc.).

Despite that, I decided I could test fit the bulkheads to the sides to ensure everything will fit. Most everything looks real good but I will need to do some trimming at the fire wall to ensure everything is straight and will fit the main spar cutout. Still, I don't anticipate any problems finishing this chapter or the next.

Note: Yes, I know the instrument panel is installed backwards. Not to worry though, none of the bulkheads are permanently attached.


Saturday, November 10, 2007

Chapter 5 - Fuselage sides - Part 2

Last weekend my brother again headed down from Seattle and gave me a hand glassing up the two sides. Each side took a few hours each to prepare and glass up. For the most part everything went togather as planned. However somehow a couple of foam peices shifted while the micro was setting up and I had to cut and reglue that bond.

Also I used my brothers Fein tool to trim the glass on one side after it set up. I really like the tool and have found it quite useful. Unfortunately the vibrating motion of the blade pulled the cured glass away from the foam in a couple of places. I was able to get some pure epoxy into those places and after applying some weight the foam and glass were well bonded back to gather.


Wednesday, October 31, 2007

Chapter 5 - Fuselage sides - Part 1


My latest shipment of materials arrived today. I considered both ordering from Wicks and Aircraft Spruce. Wicks sold the 3/4" R45 foam in 48x24 peices, that would have required 4 sheets for both fuselage sides. Aircraft Spruce had the sheets in 48x32. Not only where Aircraft Spruce's sheets cheaper, I also only need 3 due to there larger size, this saved me almost $100.00.

Pictured is my table saw. A table saw might seem like overkill, but it made measuring and cutting quick, easy and accurate.

Also some of you may be happy to notice my work table is showing good signs of use. Compare with the almost spotless surface a couple of months ago.

Sunday, October 21, 2007

Chapter 4 bulkheads - part 2


I finally finished chapter 4. I was a little curious to see how this was all going to fit together so I clamped every thing up temporary.

Saturday, October 6, 2007

Chapapter 4 bulkheads - part 1


It's been a while since my last post here, but with my brother's assitance we have made a moderate amount of progress.

On Friday the 21st, my brother headed down from Seattle and worked on the landing gear brackets while I worked on the front seat bulkhead. Also pictured are some spruce parts he prepared for me at his shop in Seattle.

The rear seat back was completed yesterday.

Tuesday, September 4, 2007

First part!


My brother gave me a call today to have me check my e-mail. I was surprised to see the following photos. He was able during his lunch break to stop by a specialty wood supplier and pick up some birch plywood and was kind enough to cut out the firewall for me.

I am a little jealous that I didn't get to cut it out, but Grant is a real craftsman and I am glad he took care of it for me.

I wish my workshop floor was as nice as his!

Sunday, September 2, 2007

Practice layup 3


Here is the book end, Im not real proud of this, but I suppose this is what practice is for.

Practice layup 2


Here is the second practice layup, the confidence layup. Today I got impatient and decided to test it. Unfortunately I did this upside down and the piece started to crack a little. I then tested it correctly and is flexed a little but held my weight with no problem.

Saturday, September 1, 2007

Practice layup 1.

I have completed the first practice layup. In the end the part weiged in at 9-7/8 oz. The manual says that the lightest the layup should be is 10-1/2 oz. with out voids. My layup did not contain any voids, so its a mystery how I managed to make the layup so light. Perhaps my scale is not accurate.

The EZ-Poxy provided with the practice kit is a lot smellier than I anticipated. I used West system epoxy when I built my kayak.

It had an odor, but nothing like the EZ-Poxy. I also for some reason do not like the color, I suppose this really shouldn't matter. The epoxy did wet out the glass well though, so I might consider using it if I can get used to the smell.


I have decided to use a digital scale to portion the epoxy. The EZ-Poxy came in small paint like tins so I transfer the resin and hardener to squeeze bottles. At first I only had one for the hardener and didn't know what to do for the resin. Then I noticed I had an empty ketchup container. It works quite well.


My brother initially rigged up a bungee to keep the glass cabinet shut. This worked well for a while, but I wanted something more permenat, so while waiting for the epoxy to set up I quickly put together different solution as seen in the picture.

It was nice to have the materials on hand to build the cabinet and fashion the door stay. It's a good reminder to not throw away materials that can be used later if at all possible.

Thursday, August 30, 2007

First order arrived!


I came home today to find a good size box waiting at my front door from ASS (Aircraft Spruce & Specialty. Unfortunate acronym). ....Editorial note, Aircraft Spruce uses ACS for their acronym.

I now have some sample materials to practice with.

Sunday, August 26, 2007

Shop work.


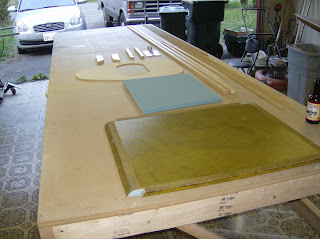
My brother headed down from Seattle this weekend and helped me build a work table. The table is 12'x4'.

It took a while to get used to the things size in my small garage, but after using it to build a fiberglass cabinet from some scrap material, I think I will work out great.

Also pictured are the fiberglass cabinet, my old workbench and two other projects: a bathroom vanity, I still need to make a counter top for and a cedar strip kayak I built a few years ago (my first work with fiberglass and epoxy).

Be assured that I am not responsible for the stylish floor and paint in the garage. Those features were added before I bought my house.

I have a lot of organizing and clean up left, but I can start to picture how this will all work out.


Wednesday, August 22, 2007

Flying Backward Blog opening


This blog is intended to document my progress in constructing a Long-EZ airplane.

Some might call the aircraft an Open-EZ because I am not constructing the plane from a purchased set of drawings, but rather utilizing the TERF CD set in addition to the great wealth of information available online. However the design is identical and so for now, for simplicity, I will call it a Long-EZ.